Liferay DXP offers extensive flexibility for customizing and configuring its rich text editors. If you need to modify the configuration of an editor, such as adding new buttons or changing behavior, you can do so by implementing the EditorConfigContributor interface. This guide walks you through the process of creating an OSGi module that will allow you to modify editor configurations for specific portlets or globally within Liferay.
Step-by-Step Guide for Configurations
1. Create an OSGi Module
The first step in modifying an editor's configuration is creating a new OSGi module within your Liferay project. This module will contain the logic for configuring the editor.
- Create the Module: In your Liferay project, create an OSGi module using Liferay’s module creation tools or IDE integration (e.g., Liferay Workspace, Blade CLI, or Eclipse with Liferay tools).
- Define the Package and Class: Inside the module's
srcdirectory, create a unique package name (e.g.,com.example.editorconfig) and add a new Java class within that package. This class will extend theBaseEditorConfigContributorclass, which provides a foundation for contributing to editor configurations.
2. Implement the EditorConfigContributor Service
To make the editor configuration changes, your class must implement the EditorConfigContributor service. This service is used to modify or extend editor configurations for specific portlets or globally.
@Component(
    property = {
        "editor.name=ckeditor", // For ckeditors configuration
        // "editor.name=alloyeditor",  Use this For alloyeditor's configuration
        "javax.portlet.name=com_liferay_blogs_web_portlet_BlogsPortlet",
        "javax.portlet.name=com_liferay_blogs_web_portlet_BlogsAdminPortlet",
        "service.ranking:Integer=100"
    },
    service = EditorConfigContributor.class
)
public class MyEditorConfigContributor extends BaseEditorConfigContributor {
    @Override
    public void populateConfigJSONObject(
        JSONObject jsonObject, Map<String, Object> inputEditorTaglibAttributes,
        ThemeDisplay themeDisplay,
        RequestBackedPortletURLFactory requestBackedPortletURLFactory) {

        // Logic to modify the editor's configuration goes here

    }
}
3. Understanding the @Component Annotation
The @Component annotation is crucial as it registers your service and specifies the editor configuration properties. In this example, we are targeting the CKEditor used within the Blogs and Blogs Admin portlets:
- editor.name: Indicates the editor's name (e.g.,
ckeditor). - javax.portlet.name: Specifies the portlet where the editor resides (e.g.,
BlogsPortletandBlogsAdminPortlet). - service.ranking: Defines the priority of your service relative to other services. The higher the number, the higher the priority.
4. Modify Editor Configuration in populateConfigJSONObject
The populateConfigJSONObject method is where you modify the actual editor configuration. The method receives a JSONObject representing the current editor configuration, and you can update this object to reflect the changes you want.
@Override
public void populateConfigJSONObject(
JSONObject jsonObject, Map<String, Object> inputEditorTaglibAttributes,
ThemeDisplay themeDisplay,
RequestBackedPortletURLFactory requestBackedPortletURLFactory) {
JSONArray newStylesSetArray = JSONFactoryUtil.createJSONArray();
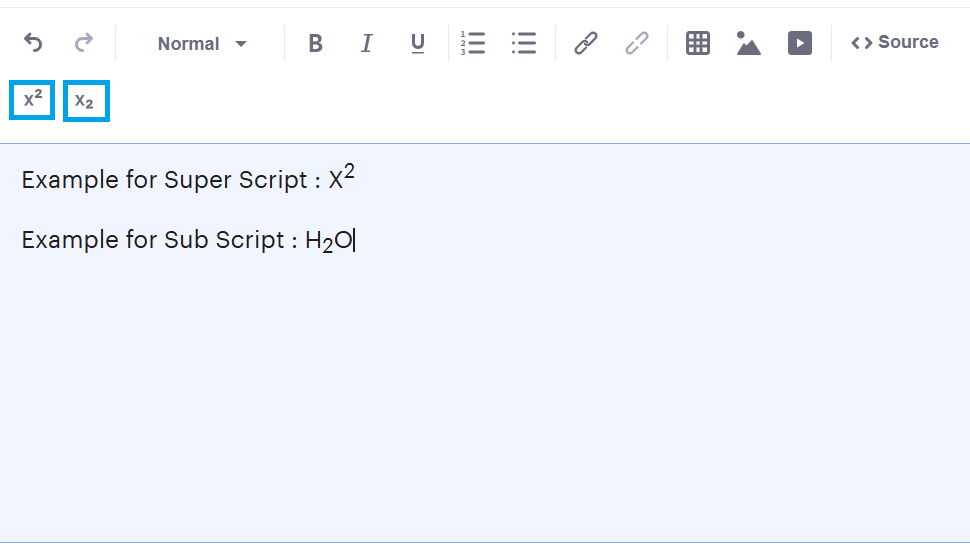
//Adding Superscript and Subscript to CK editor
JSONArray newJsonArray = JSONFactoryUtil.createJSONArray();
newJsonArray.put("Superscript");
newJsonArray.put("Subscript");
jsonObject.getJSONArray("toolbar_liferay").put(newJsonArray);
}In this code:
- jsonObject: The editor's current configuration.
- toolbars: This retrieves the toolbar configuration.
- Superscript: A superscript is a character, number, or symbol that is positioned slightly above the baseline of the text.
- Subscript: A subscript is a character, number, or symbol that is positioned slightly below the baseline of the text.
5. Handle Multiple Portlets and Editors
You may want to apply this configuration globally across all instances of an editor, or only within specific portlets. You can target multiple portlets by specifying their names in the @Component annotation. If you want to apply your configuration across all portlets where the editor is used, you can omit the javax.portlet.name properties.
@Component(
    property = {
        "editor.name=ckeditor",
        "service.ranking:Integer=100"
    },
    service = EditorConfigContributor.class
)
public class GlobalEditorConfigContributor extends BaseEditorConfigContributor {
    @Override
    public void populateConfigJSONObject(
        JSONObject jsonObject, Map<String, Object> inputEditorTaglibAttributes,
        ThemeDisplay themeDisplay,
        RequestBackedPortletURLFactory requestBackedPortletURLFactory) {

        // Modify global editor configuration here

    }
}
6. Deploy the Module
Once you have completed the configuration, the final step is to generate the module’s JAR file and deploy it to your Liferay portal:
- Build the Module: Use your build tools (such as Maven or Gradle) to build the module into a JAR file.
- Deploy: Copy the generated JAR file to your Liferay Portal's
deployfolder.
When the module is installed and activated, the editor configuration changes will be applied.
Conclusion
Modifying the editor configuration in Liferay DXP is a powerful way to customize the user experience within your portal. By implementing the EditorConfigContributor service and using the @Component annotation, you can target specific editors, portlets, or apply global changes. With these steps, you can easily adjust toolbar buttons, editor behavior, and much more to fit your needs.
Happy coding! 😉